VHS Tape Repair Guide
Video for VHS Repair
This video guide will detail all the steps for repairing your VHS tape:
Broken VHS Tape? No Worries!
For many families, video tapes contain some of the most precious memories they have. Since the advent of the camcorder, millions of people worldwide have been filming important events in their and their family’s lives. At some point, many of us have had a tape break, or a VCR eat up their video tape, resulting in a tape that simply won’t play normally anymore. At first glance, you may think all hope is lost, and your tape is gone forever…but it’s actually very easy to repair video tapes yourself! After reading this guide you will have the knowledge to not only repair VHS tapes, but repair video8 tapes, repair betamax tapes, or even repair MiniDV tapes!
Tools You’ll Need
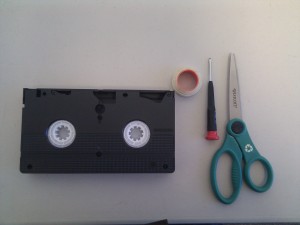
Having worked with large amounts of older media for some time now, I’ve seen nearly every problem a video tape could have. The most common problem is that the tape simply snaps or breaks in the middle somewhere. For this guide, I will be demonstrating the repair of a VHS tape, which is the most common tape repair I see. To perform your own repair, you will need a phillips-head screwdriver, some splicing tape, scissors, and a steady hand. If splicing tape is hard to come by in your area, it’s easy enough to find on Amazon.
What’s Broken in Your Tape?
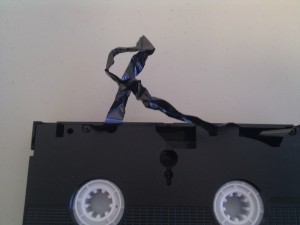
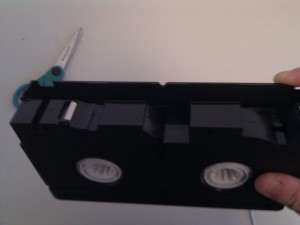
First inspect the tape, look under the flap, and see if the tape is damaged. If the tape has split, the evidence will be obvious as there would either be a mess of garbled up tape:
or no tape visible under the protective flap:
How to Take Your Tape Apart
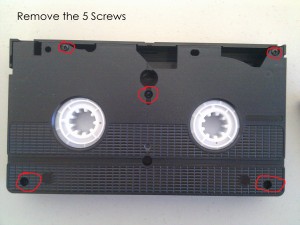
Once you see that the tape is indeed split, the next step is to open the casing of the VHS up. For this step you will need a standard sized phillips-head screwdriver. The typical VHS cassette contains 5 screws, one at each corner, and one in the middle.
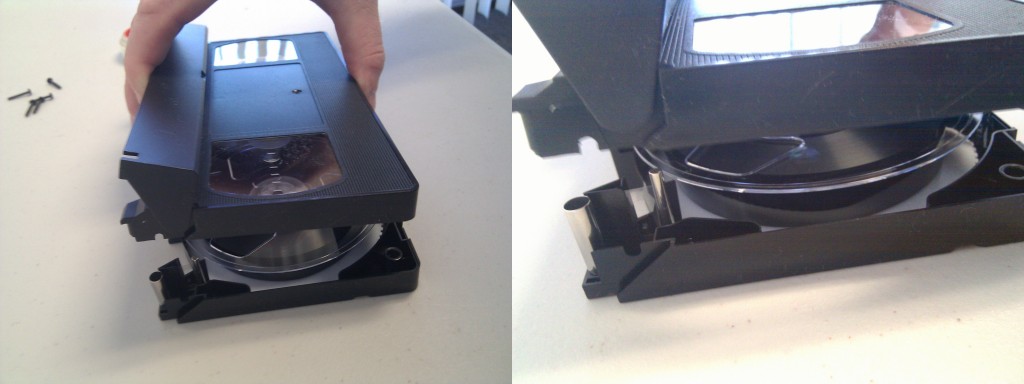
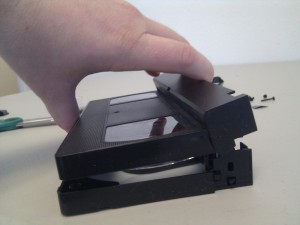
Once you remove all 5 screws, turn the tape OVER, so the front is facing you, and then gently rock the casing back and forth to lift it up from the base, taking care not to disturb the internal components too much. If you labeled your tape with a sticker, it may need to be cut down the middle in order to separate the two halves of the casing.
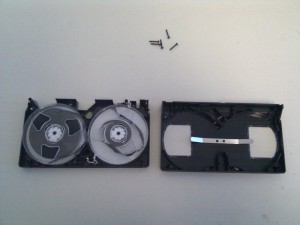
The casing should now look like what I have in the image below. Take special note of where the internal components are located, in case anything should get bumped loose or knocked out of place. Taking a digital photo of the opened case, or having a diagram will help you with this.
Splicing a Video Tape
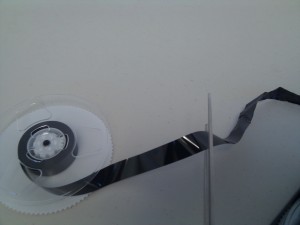
The next step is to give yourself enough “clean” tape to work with. If the tape is mangled, it’s best to simply remove all portion of tape that has been damaged. That way you’re left with nothing but clean undamaged tape. Unwind the tape from the reels a little bit to give you about 6 inches on both sides. You may need to gently lift the reel from the cassette in order to pull some of the tape out. Once you have the two ends of tape, take some scissors, and ensure a clean cut. It’s much harder to splice a tape with a frayed or jagged end.
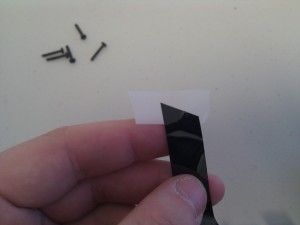
Cut a small strip of splicing tape (scotch tape can and will work, just know that it’s much thicker and harder to work with than splicing tape and not advised) Now the trick is to stick both ends of the video tape as flush as possible against the splicing tape, it’s best to splice the underside of the videotape, but not essential.
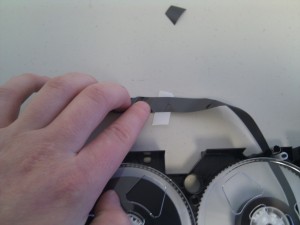
Now your goal is to remove as much of the excess splicing tape as you can without removing the actual video tape. You can use an x-acto knife if you prefer, but I just use scissors. You’ll need a pretty steady hand to perform this step successfully. Also, be sure you’re not exposing any of the tape’s sticky side, as this will gum up tape heads.
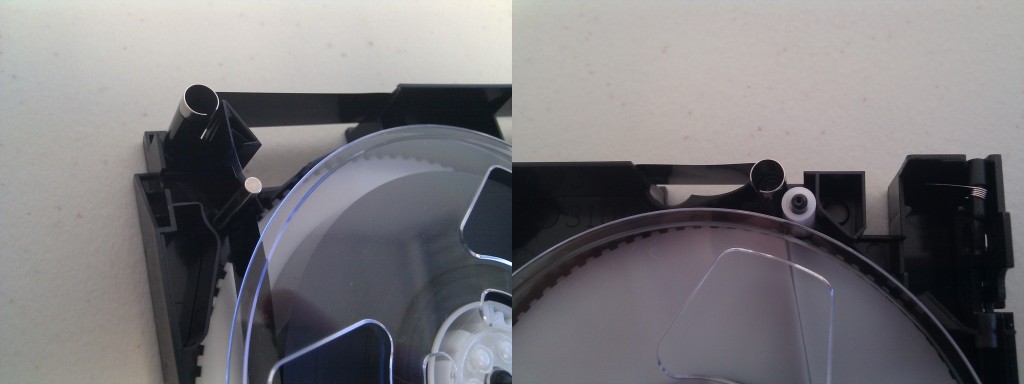
Your video tape should now be all spliced and almost as good as new. Now you need to run the tape through the pinch rollers and wrap it around the top of the cassette. Use the images below as a guide for how the tape runs through.
Putting your VHS Back Together
The last step is to put the casing back together the same way you took it apart. Gently rock the top part of the casing on (You may need to hold the protective flap up as you’re fitting it back on) and then screw it back together.
Voila! You have, hopefully, now just repaired your video tape! Remember, if your tape is severely damaged, it’s best to bring the repair job to a professional Video Tape Repair Service which has experience with all types of different media, and knows the best way to go about fixing them.
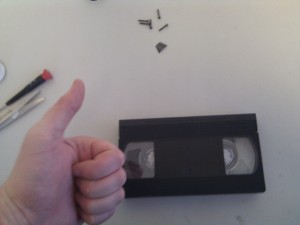
Still need help? Visit our video tape repair page for more information.
Convert your VHS to Digital
Tapes are easy to damage, and often difficult to repair. DVD Your Memories has been providing the best solution to this problem since 2006. We have four locations in Southern California that have been the best in the digital transfer business for nearly 20 years. Our VHS to digital services are consistently the best-reviewed in their respective areas. As of 2016, the production of new VCRs has officially stopped, but digitized tapes don’t need a VCR, and they never get damaged.







Great post!
How do you suggest rewinding the tape once it has been repaired? Is it safe to say the splice will hold up to a VCR’s standard rewinding speed?
Thanks!
Once the splice is in place, it should be good to go for normal VCR use. I suggest manually rewinding the tape a few rotations past the splice point if you’re worried it may not hold.
You can do this when the casing is apart, or if its screwed together, you can stick a pencil or pen in the little hole on the back of the cassette, which will disengage the lock on the reels. Good luck!
A tape I am trying to repair has a different screw in the middle that looks a little like a Mercedes-Benz logo. I once had a special screwdriver in that shape but can’t find it. What are those screws/screwdrevers called?
Most likely a Torx screw. There is a chance it could be a strange proprietary format specific to that tape, in which the best case would be to transfer it to a new cassette shell. The link below lists the most commonly used screws that you can use to match it up.
Thanks for the guide, I repaired my daughter’s old Disney tapes with this method, saved me a headache.
How do you separate the clear-plastic reels from the spools of tape? There is supposed to be a clamp that can be removed temporarily with a pointed tool like a tiny screwdriver, maybe a pen point. You put the tool inside an opening in the reel created for this purpose. Can you post a diagram marking these tiny parts? (Note: my goal is to clean mildew).
The easiest way I found to remove the reels is to actually cut the leader tape with scissors as close to the reel as you can. After you’re finished cleaning, you’ll just re-splice the leader tape back together again.
I do it this way because a lot of times (especially older tapes) the little clamps do not like to be disassembled and reassembled, and when you do manage to do it, they often fall apart and do not hold the tape to the reels very well.
This post was a lifesaver! I was in the process of transferring my family movies, which were converted to video in the 1980’s to dvd and I rewound the tape. Well the end of the tape separated from the reel. I was able to fix it in a few minutes with your post, and, I did not have to pay anyone or worry about being able to find someone to fix it for me…Thank you very much!
Hi! I have two questions:
1. Before I splice the torn video tape, should I cut out/off all the crinkled part of the video tape and just splice together two smooth ends, or can I leave it and it will run through just fine if I leave it (albeit the video quality will stink)?
2. Will the VHS still be able to be copied on a DVD after such splicing?
Thanks,
Chantalle
Hi Chantalle,
You can splice the two crinkled ends, but there is a chance that the tape will get stuck or have trouble running through the mechanisms in the machine, but chances are that you will be fine doing it that way.
The VHS will also be perfectly fine for transferring to DVD once the splice has been completed.
-Chris
Alright, Chris!
Wish me luck. Thanks so much, your website is super informative!
Hi
Just found your website and I too am trying to transfer my recordings from VHS to a DVD, the problem is the pictures are really jumpy etc. and no amount of tracking will bring them back (they are about 18 years old mind you). The tape inside the VHS looks ok andnot twisted or mangled up, will this procedure help witht the playback quality too or do you have another suggestion. Thanks
Hello, Chris, Tryed your method for a repair and it worked like a charm. Thank’s for sharing the great info.
Your video was super helpful!! Thanks!!!
Thank you very much for this! Received a VHS tape in the mail the other day, and tried to play it only to have my VCR spit it out with some tape pulled out. With this guide, I was able to fix the tape. 🙂
I live in a small town and can not find splicing tape. Do you have a source, Or where should I look in nearby towns?
Hi Larry,
We recommend purchasing online if you can. Here’s a link to the same tape we use in our stores: https://www.tapecenter.com/tapecare.html
Thanks!
-Chris
My tape snapped at the pole, so I taped it back and put the cassette back together and it works properly except now the VCR says “no data” when I attempt play it and just a black screen. What is wrong?
TC,
If I had to guess, it’s probably a tracking issue. The heads aren’t pickup up enough sufficient data to create video. If the problem persists, try to see if you can get your hands on an alternate VCR to try. If not, I would suggest having us, or another professional transfer company take a look at the tape to inspect for damage.
I have a VHS tape that will not turn. The tape itself isn’t damaged but it will not turn. How can I fix this? This tape is important to us.
Hi Carrol,
If the tape will not turn, then likely the sprocket mechanism is malfunctioning. To remedy this problem, I would advise checking through my repair guide to see if the tape is able to be moved at all. If the sprockets/gears are completely stuck in place, I would recommend purchasing a blank VHS tape, then transferring the insides of the broken one into the new casing. This should allow the reels to again turn.
Hey Chris, this website helped me to reassemble the VHS after opening it to see what was jamming. I wasn’t sure of the tape path, but the pictures helped tremendously. Thanks for posting this!
I wanted to leave a note. My husband Richard passed away this past February 5 aged 70. While going through his things I found an old videotape and tried to play it, but it broke. With your instructions on this page I was able to fix it, play the tape and copy it to DVD. It turns out it is video of my husband when he was about six years old; riding a pony, playing at the beach, and what looks like his first day of school! Words cannot thank you enough for the joy it’s given us to have these memories, but THANKS!!!
It took a few tries, but it worked! Thank you so much! 🙂
Hi there!
I have a VHS tape I’m trying to view. When I put the tape into the VCR, it automatically tries to rewind it, but can’t and then winds up ejecting it. I’ve replaced the casing and reassembled it thanks to your videos, but it is still doing the same thing. Other VHS tapes work fine in the VCR. Any ideas or fixes you can share would be greatly appreciate. I like many others on here would like to save my family memories and do the DVD conversion.
Hello, I have an old VHS tape with family memories that I am trying to save. When I put the VHS tape in the VCR, it automatically attempts to rewind the tape but eventually winds up ejecting it. It is not the VCR as other tapes play just fine. I’ve switched out the casing to a new one and even did the manual rewind of the tape as shown above. Would you have any other suggestions and when I do the manual rewind, should both wheels be turning? Any help would be greatly appreciated!
Thank you very much! We are grateful for your generosity.
Hi, I have a problem.
My VCR plays the tape fine for around 3-5 seconds and then stops. Pushing PLAY starts the tape again for 3-5 seconds and then it stops again. Strangely enough, I am able to rewind the tape completly, or fast-foward it for around 30 seconds. What’s happening?
I have a video that was stomped. So the case is broken. and of course part of the tape torn. Is this something y’all could repair for me?
I successfully spliced a broken mini-DV tape together and put the reels back into the old case, but I notice a few little parts that are loose. Don’t know whether to put them or orient them. Can you somehow describe how to solve this problem or perhaps send a close-up photo illustrating this. Thanks. Marty
How do you fix the tape that runs itself and it kept running until nothing was left in all of it went on one.. went off the other spool…
Hi Chris, I took a vhs tape apart and when I took the cover off all the little parts fell out. there is 2 tiny springs 2 black wheel lock (I guessLouise ) and 2 pole covers. but not sure how they go back on, any advise? The tapes are ok I’ve done that before. Louise
Yes broke top of tape need some one to transfer it to DVD it’s still in tack thank u need help last tape of my mother alive
Much appreciated.
Your section on threading the tape correctly helped me sort out a previously unplayable/jammed tape. (have no idea how the tape jumped out of proper path.)
I need to repair my camcorder cassette that I broke are you able to transfer to a Dvd or fix it.It man’s the world to me.Thankyou
I can hear the tape every one talking but shows a blue screen