


Cleaning Your VCR: The Right Way
Why Your VCR is Dirty
If you’ve noticed a drop in the quality of the picture you’re getting from your VCR, be it general fuzziness, static, or lines through the picture, your VCR probably needs to be cleaned. The element in your VCR that’s probably dirty is the VCR read/write heads, which translate data from the tape to the screen. While there are fast methods to clean them, we don’t recommend them. Use the following method instead.
Why Clean your VCR Heads?
If you still own and use your VCR, the chances are that it has a tendency to create unwanted effects on your tapes like static, or lines through the picture. This is usually due to having dirtied up heads on your VCR. It’s possible to clean the VCR heads, but it’s also very easy to do it wrong and damage the delicate heads. Since the production of VCRs is discontinued as of 2016, it’s even more important now to make sure that you take care of yours. New VCRs are increasingly unavailable and expensive, so it’s much better to keep the one you have in good shape.
How Dirty Heads Affect Picture and Sound
The heads inside your VCR are called read-write heads. The heads are what actually read the data from your tapes, and then transmit that data into your television screen. If these heads become dirty, over time the picture quality will degrade further and further until you clean them. At DVD Your Memories, we’ve transferred hundreds of thousands of tapes in our video transfer service to digital files and DVDs. In our experience it’s vital to the transfer quality to keep VCR heads clean. Our best-in-class video transfer is due in part to the fact that we keep the read/write heads on our VCRs very clean.
What Not to Do
Over the years, you may have seen video tape cleaners, or cleaning devices in the shape of a video tape that you insert into the VCR to clean the heads. While this method can sometimes work, it’s not really a good idea because these can actually damage or dirty up the heads even further with repeated use. Don’t use a video head cleaner, and do it by hand. Manual cleaning is safer, more effective, and will make your VCR last longer. A damaged VCR threatens your tapes, and playing family memories in a VCR that’s been damaged by a cleaning tape threatens the picture and sound quality that actually exists on the tape in addition to the one on the screen. Clean your VCR manually, it’ll keep your memories far, far safer and looking and sounding much, much better.
Items You’ll Need to Clean VCR Heads
The best way to clean the heads is a fairly easy process, but requires attention to detail to avoid damaging critical components of your VCR. The guts of your BV VCR are actually pretty delicate, so be prepared to be very careful. The items you’ll need are pieces of white paper, a screwdriver and a bottle of isopropyl alcohol. In all likelihood, you should already have these items around your home.
How to Clean VCR Heads
Getting Under the Hood
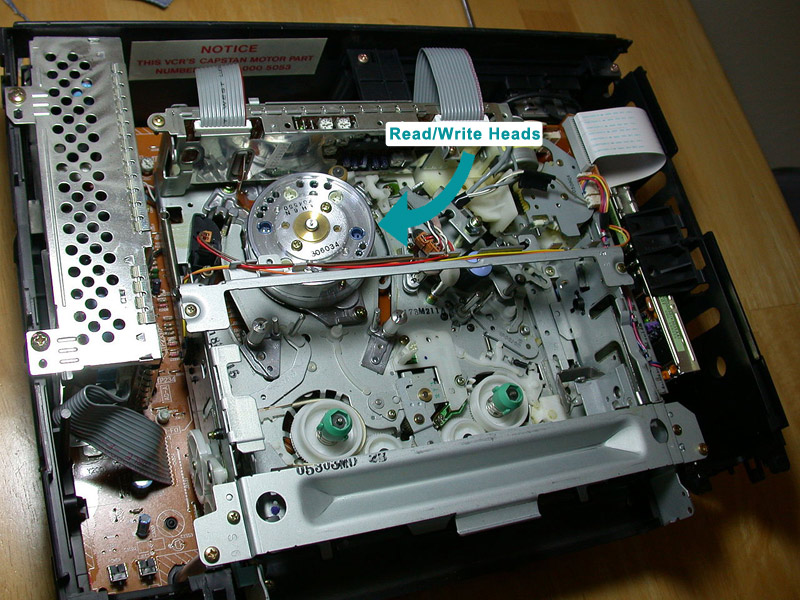
The first step is to unplug the VCR, and remove the top cover, exposing the internal components. All VCRs are slightly different, but they contain the same basic parts. Even if you have a BETA VCR or some other format, the parts ought to be the same. The image below will show you the read/write heads you need to be aware of.
Cleaning VCR Heads with Alcohol
Now that you have the cover off and have visibility of the read/write head, you can begin the cleaning process. Cut your piece of white paper into strips about 1.5-2″ thick and about 4-5″ in length. Now, soak half of one of your strips with alcohol, making sure it’s wet. To clean the heads, place the wet piece of paper on the drum and rotate it counter clockwise several times. Lightly press your finger against the drum with the hand holding the paper while you spin it.
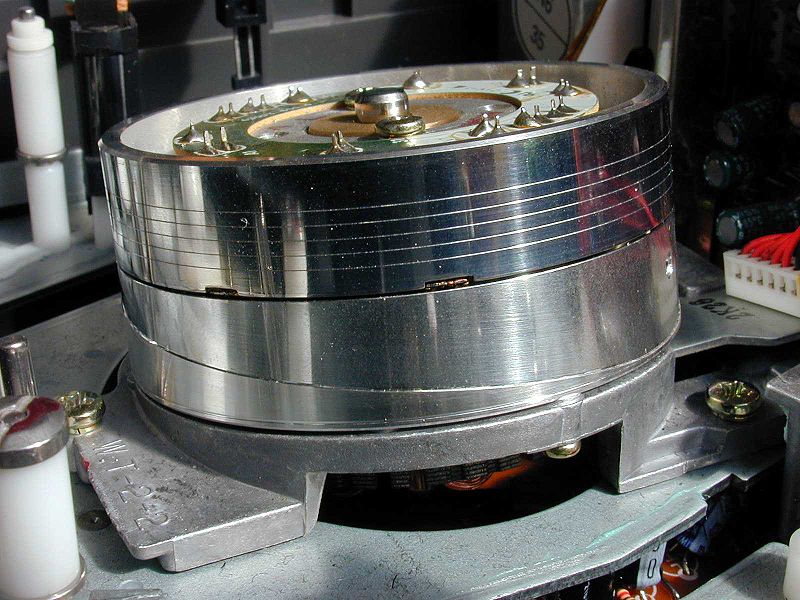 After a few rotations, take a look at the paper and you’ll probably notice some dirt or grime left on it. Keep repeating the process with new strips of paper until the paper no longer has any dirt on it. Keep in mind that VCR heads are very delicate, and you should use a very light touch when cleaning them, or risk damaging them even further.
Put your VCR Back Together
Once you’re finished, that’s all there is to it! Put the cover back on, plug the VCR back into the wall, and enjoy! Your VCR should now provide you with more clarity until they dirty up again. You’ll know it’s time to clean it again when you see streaks, audio cuts, or tracking errors. Do yourself and your VCR a favor and clean it manually, not using a head cleaner tape.
Having said all of that, your VCR and your tapes won’t last forever, even with the best maintenance possible. Consider transferring them to digital format at any one of DVD Your Memories’ four locations in Southern California.